Traditional MBT requires computer-readable models. These models should contain detailed information to become executable. A tester or business analyst usually has a special domain knowledge of the system. Therefore, higher-level test cases would be enough that make it possible to create a more compact model. That’s why we introduced two-phase modeling when the modeling process is divided into two parts:
- high-level modeling,
- low-level modeling.
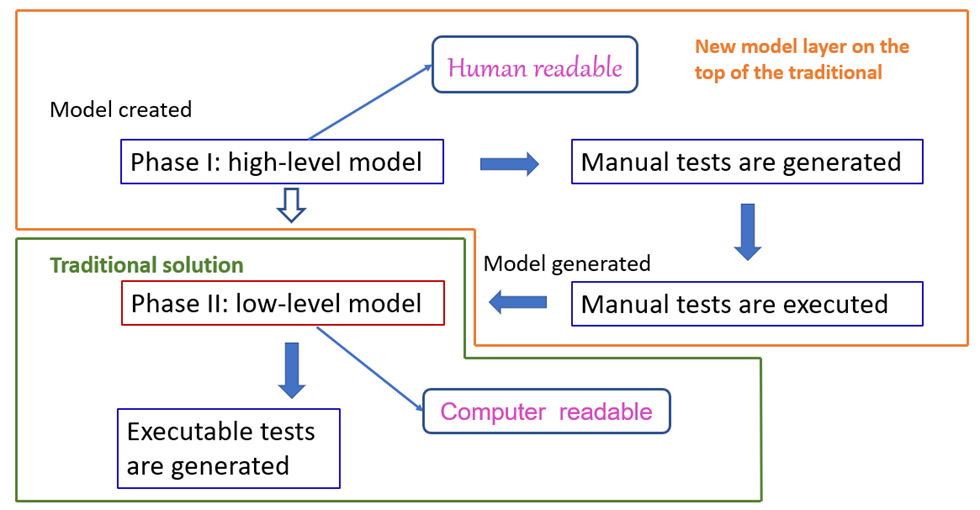
The high-level model is human-readable and can be done before implementation. The low-level model is computer-readable, and it’s generated from the high-level model during manual test execution. The two-phase MBT process is the following.
Step 1. Choosing appropriate test selection criteria.
Here the process changed as the first step is to select the appropriate test selection criterion. The reason is that the modeling is driven by the test selection criterion. It means that the missing model steps are displayed and offered to insert.
Step 2. Creation of the MBT model.
In this step, modelers create high-level models from requirements/user stories and acceptance criteria. The high-level model consists of high-level steps. These steps are implementation-independent and as abstract as possible. For example, an action can be as:
add items so that the price remains just below EUR 15
A tester can do it in different ways such as
- add item for EUR 11,
- add item for EUR 3.
or
- add item for EUR 9,
- add item for EUR 5.
The model elements can be as high-level descriptions as possible. The only requirement is that the tester can execute it. In this way, the model will be more compact and remains more understandable. For example, a single step for modeling a password change can be:
modify password => password is successfully modified
In contrast, a low-level model requires the following steps:
select password modification,
insert existing password,
insert new password,
insert new password again,
submit password modification => password successfully modified.
Let’s consider our account creation example. You can see that the steps are higher level, and the graph is more understandable. Only five actions remained, originally there were nine.

Figure 1. High-level model for account creation
Let’s consider the validations in the models. How to model the outputs during high-level modeling? It’s much simpler since outputs are also abstract. For example, if we should validate a whole screen as a response to an action, then the tester can do it later when the test is executed. The model should only contain ‘=> check the screen appears’. When the test is executed, the tester can check everything similarly to use exploratory testing, see Step 3. However, in some cases, concrete output values can be added to the model.
Step 3. Generating the abstract test cases
Based on the model, the abstract test cases are generated. These test cases are only executable by humans and can be considered as ‘live documentation’. The abstract tests are also examples of how the system works and with them, the requirement specification can be validated. This is very important as requirement specification is usually not complete and error-prone leading to some false or missing implementation. The cheapest way to fix the specification problems is the validation of the high-level model or abstract test cases. We will see concrete examples for improving the specification later. This is an excellent defect prevention method as an incomplete or faulty requirement leads to faulty code, but these test cases can be used against implementation leading to fewer defects. This is not only an efficient defect prevention, but also cheap as it’s a side effect of test design automation. It usually cannot be done by applying the single-phase approach as the models are created after the implementation, otherwise, lots of re-modeling work should be done.
Step 4. Test execution and low-level model generation plus test execution
The prerequisite of this step is the implemented SUT. The tester executes the abstract test cases one by one, while the test design automation tool generates the low-level model step. For example, if the high-level model step is ‘add pizzas to reach EUR 40’, the tester first selects the ‘shopping’ feature, then selects a Pizza Chicken for 12 euros twice and a Pizza Smoked Salmon for 16 euros. While clicking on the selection and then the add buttons (three times), the system generates model steps such as
When Shopping is #pressed
When add button for Pizza Chicken is #pressed
When add button for Pizza Chicken is #pressed
When add button for Pizza Smoked Salmon is #pressed
These model steps are the same as in the traditional model steps in Step 3 and are computer-readable. The output is also generated on the fly. In most cases, the output is a value or the visibility of some UI elements. Therefore, the validation step is usually an additional selection, where the output value or the visible UI object is selected. Other validation commands such as ‘non-visible’ or ‘active’ can also be selected.
Besides the generation of the low-level model, the executable test code is also generated, and the test step is executed immediately. If a step fails, it can be fixed and executed again. When the test execution has been finished, the test case is automated, and no debugging of the test steps is needed.
The whole process is in Figure 1.

Figure 2. Two-phase MBT process
The two-phase modeling is a test-first solution as high-level models can be created before implementation. It can be used for stateful and stateless cases, see the subsequent chapters. The models are more compact and therefore understandable. Executing the abstract tests is comfortable as testers don't need to calculate the results in advance. They just need to check them, which is much easier. Using this method, the focus is on test design instead of test code creation.
