Test design – let’s make a model together
We show the modeling by applying a feature of the Glossary app. We first create a state that could be used for all the features. Here, we use it for the cheat sheet for implementation.
R1: When the term details are displayed for an item in a result list of terms, the user should be able to navigate to the details of the Next term or the previous term in the list with one click ("Next" and "Previous" buttons).
R2: The user should be able to go back to the search result list by pressing the up arrow (Up button).
R3: The navigation buttons shall have mouseover tooltips ("Next term in the list" for Next, "Previous term in the list" for Previous, and "Result list" for Up buttons)
R4a: The Next button shall only be active if there is a next term in the list, i.e., for the last term of the list, the Next button shall not be active (or not displayed).
R4b: The Previous button shall only be active if there is a previous term in the list, i.e., for the first term of the list, Previous button shall not be active (or not displayed).
R5a: If the user leaves the term details for the selected term, the buttons will disappear.
R5b: If the user changes the language, the buttons are inactive (disabled).
The first step is to create a project, then a feature. The next step is to create the requirements. The feature is the navigation among terms. Here are the requirements:
Before creating the model, you should add the URL https://glossary.istqb.org/ in the Parameters window. You should also modify the Timeout to 12 seconds.
Start with an initial state
Now you can start designing the tests, i.e., the action-state model. The first step is to accept cookies. All the test cases in this cheat sheet need this acceptance, therefore, we created a simple feature ’Start Glossary’. In this feature, we set a state that can be used elsewhere. After selecting ’ +Start designing tests’, type ’Start glossary’ as the first action. You can add a response by pressing the right arrow button (or clicking on the right arrow icon). The response can be ’ Glossary is ready to start’. Finally, clicking on the state icon

the state can be ’GLOSSARY OPEN’.
Generally, when you test a feature, the program should be in the state where the feature starts. A well-known example is that a user should be logged in. However, states can be used not only for preconditions. You can build new states based on former states and inserting new steps. For example, during testing Harmony, we created a state ‘Registered’, then based on it, ‘Project exists’, then ‘Feature exists’. You can also use states in a sequence if they are independent. For example, you can use state ‘Logged in’, ‘Personnel data filled’, and ‘Authorization data access’. ‘Logged in’ should be the first; the others can be in any order. In this way, complicated tests can be easily created.
Modeling requirement #1
First, click on the precondition icon:

and type ’g’:

Click on ‘GLOSSARY OPEN’, and the initial state is involved. Press Enter:

Action-state modeling to cover the requirements
Click on the label icon:
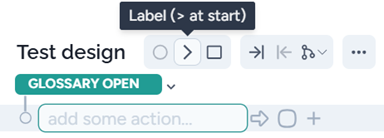
and write a short version of R1, such as: R1, the user can navigate forward and backward. Press Enter, and you can write the first action. To cover R1, it’s enough to select a text pattern that results in more than two terms. An example of this is ‘agile’. Then you should select one in the middle, and go forward, then backward. You should validate the next and the previous terms. The model can be as follows.
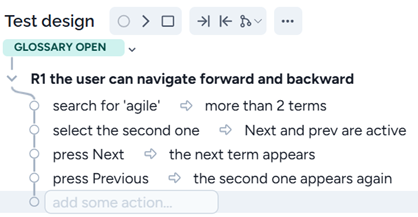
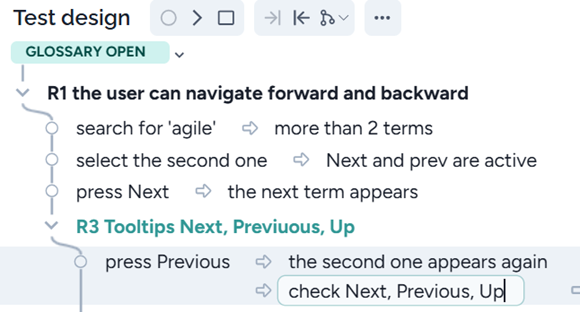
It’s not necessary to make the model in the order of the requirements. Here, it’s reasonable to continue with R3. This is only validation, therefore, we can add a response to the last step and also add the label before it:
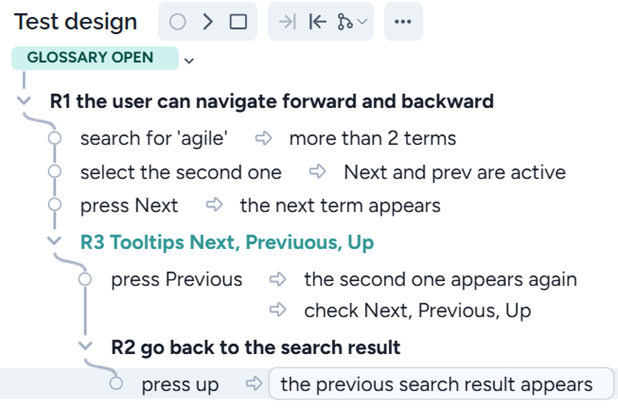
Now let’s cover R2. It’s simple, just click on it and validate the previous search result:
The next requirement is R4a. Here we should test that, arriving at the last term in the list, the Next button is inactive (disabled). To cover R4b, you should go backward until the first term and validate that the Previous button is inactive.
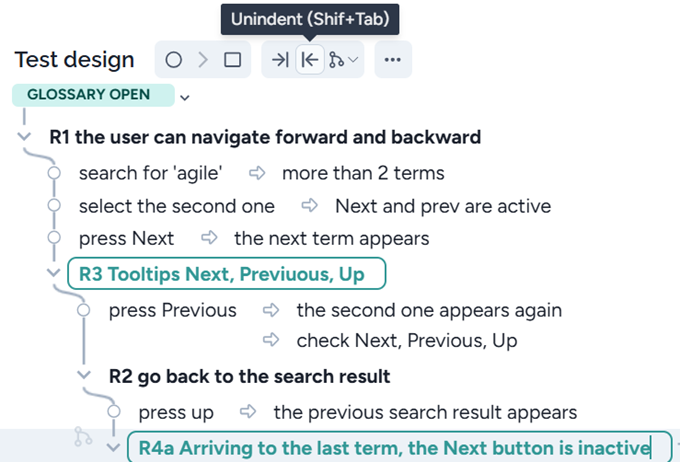
Here, the trick is that this test should follow the step ‘press Previous …’, as the last step (press up…) results in an inappropriate state. Therefore, first, you should add the new label and press the backward Tab icon:
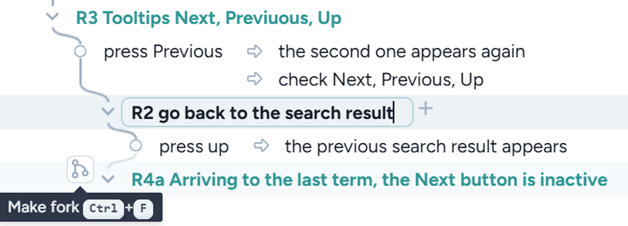
Then press Tab at the ‘R2 go back…’ label. The result is:
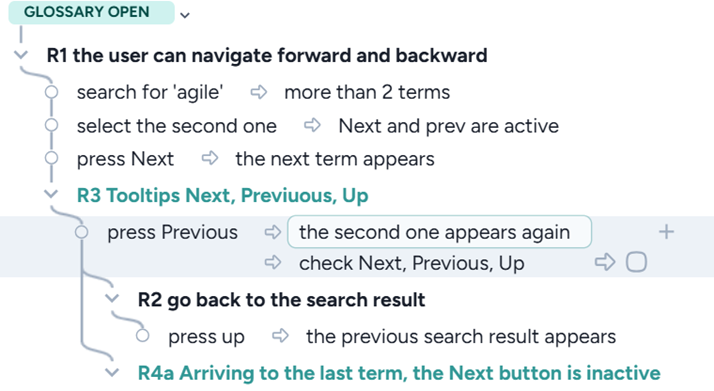
Now, click on the fork icon, and you have two test cases, one for R2 and the other for R4a:
Now we can add the step for R4a:
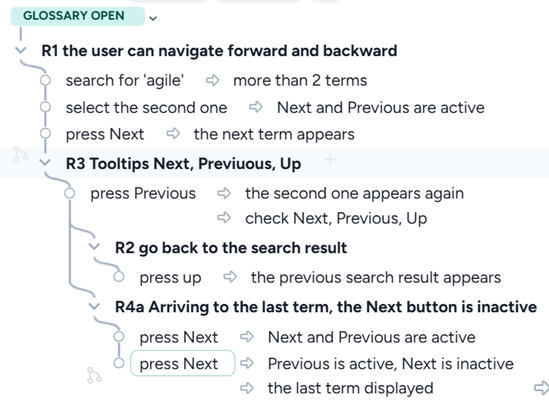
You can continue this test to cover R4b:
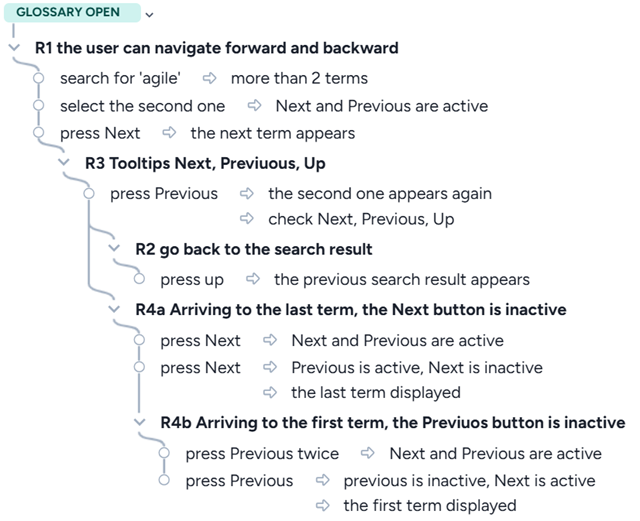
It’s reasonable to create a new test for covering R5a. You can follow the first step with the action ‘press Next’. First, press Tab at label R3 …, then by pressing the mouse right button, select ‘Fork after’:
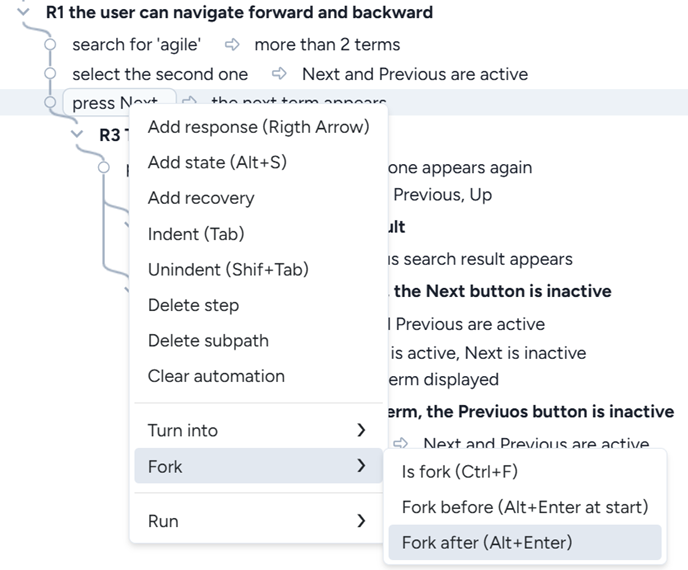
Now you can add the new label. In Harmony, you can close subgraphs of labels by pressing the icon in a red circle:
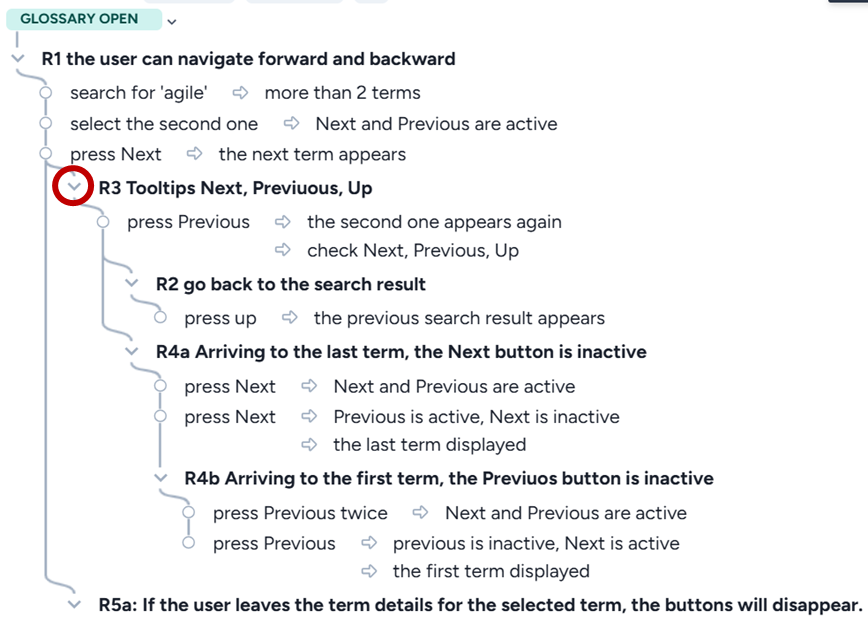
In this way, you can concentrate on the submodel you are just creating:

A single step is enough to cover R5a:

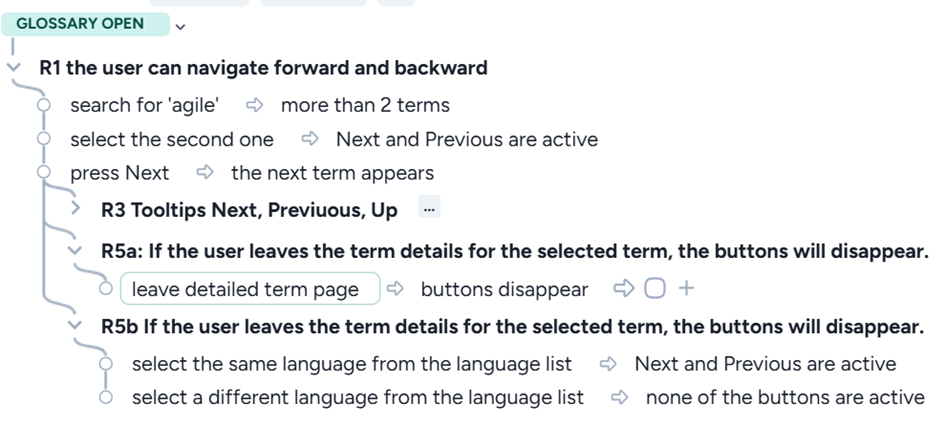
By applying for after from ‘press Next’, we can add the last label for R5b. Here we should test two things:
- Selecting the same language, the buttons remain (this is the complementer test, an extension of negative tests)
- Selecting another language, all buttons will be inactive
It’s reasonable to add the steps in the reverse order:
Make the model reliable with states
With these four test cases, you covered the requirements. The question is whether you are ready. The answer is NO! Covering the requirements, only 60-80% of the potential defects can be detected. There can be faults in the code that remain undetected by running these tests. For example, the tests involve the case when going forward/backward, we reach the last/first term, and the related buttons become inactive. However, it can occur that if we select the first or the last element, an initialization is missing, and the buttons will be initially active.
In this case, if we know that some tests are missing, it is worth using (test) states. Fortunately, in this case, the states are easy to find; we have these:
- Glossary open
- all active
- all inactive
- non-applicable (when a different page exists)
- Up active
- Next + Up active (simply Next active)
- Previous + UP active (simply Previous active)
After adding the states, we get the following model:
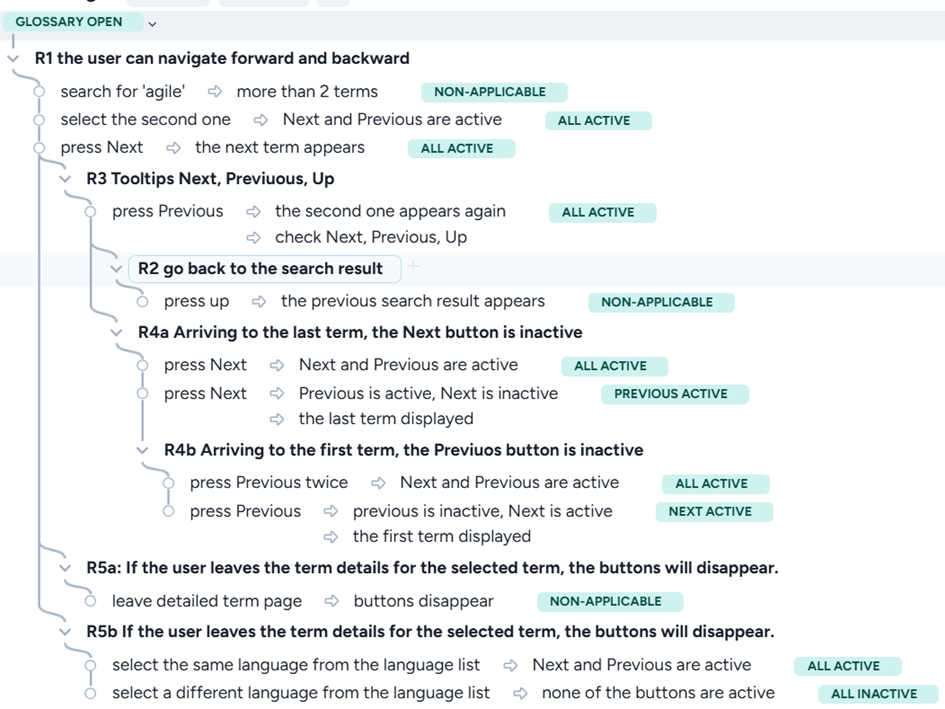
This can be transformed into a statechart:
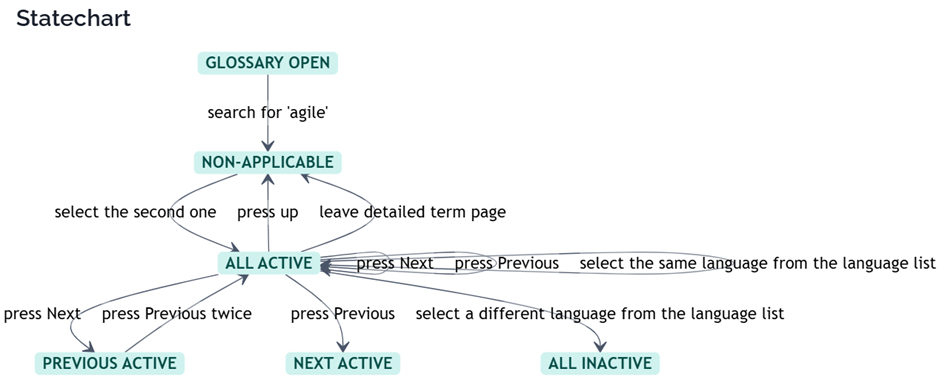
You can see that some of the possible actions are missing. Some of them:
- From non-applicable, there is no action into previous active, next active, or all inactive.
- From next active, there is no action to previous active and vice versa.
- State Up active is missing
One more thing. Here we check the states of the buttons. When the last step’s state is non-applicable, we cannot check any applicable state, and therefore, we should add a step to arrive at a valid state.
The trickiest defects can be detected by just these missing test cases. Fortunately, the model can be easily extended. For example, we need a test where we search for a text resulting in a single term arriving at Up active. Then we should select the same/different language, and leave the detailed term page. This can be done by forking after starting the app:

We needed two more test cases. The statechart has been modified accordingly:

Note that we cannot go from Up active to Next active or Previous active. However, we can go from Next active to Previous active and vice versa, by using a search pattern where the result consists of two terms. This requires one more test only, which selects the first term, navigates to the second, and then back:

We also added a press Up action starting from Next active, and we should do this from Previous active as well. To do this, we split this test:

We need an action from all active to all active itself, we modify ‘press Previous’ twice to two single backward steps.
Now we should add some actions from Next active and Previous active, such as press Up, leaving the detailed term page, selecting the same and different languages. This adds 2X2 new test cases. Here is the solution for ‘Next active’:

Finally, we should add one step where the last state is Non-applicable. As it occurs frequently, we can add a join step. Where the last step is different, we make these steps ‘end test’ steps. To make the steps join steps, add the new steps, then press back tab until it becomes join nodes for the required steps:
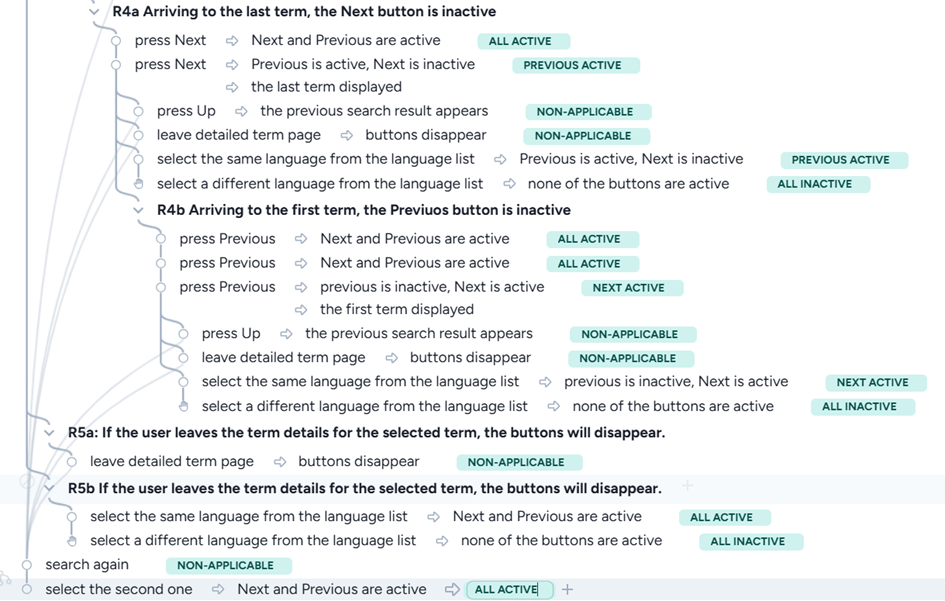
The final model
After adding all the required steps we have the following model:
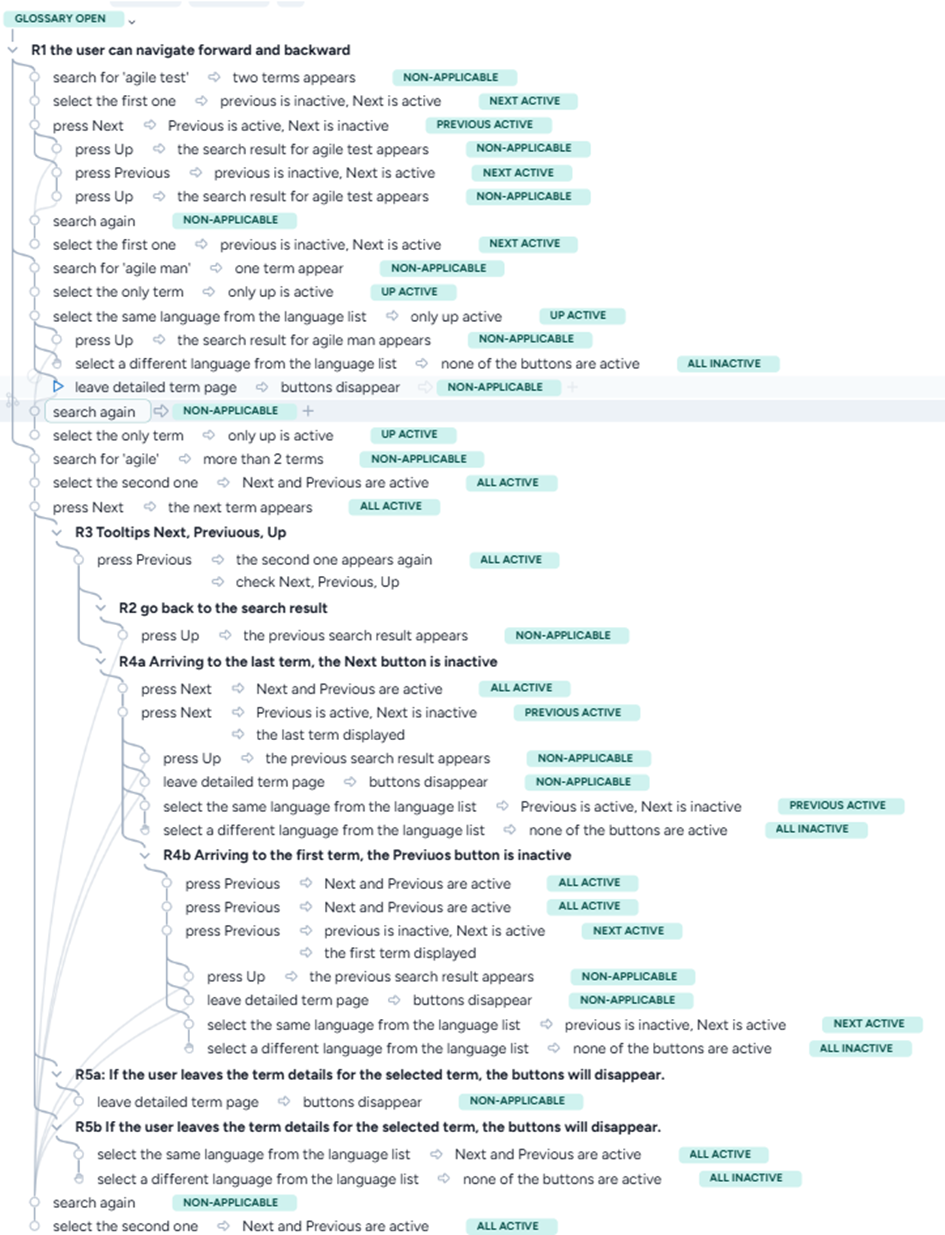
To fully test the navigation, we need 14 test cases. However, the total number of model steps omitting labels is 39. The total number of test steps is 108, about three times more.
